Part 1: The Hardwood Floor
Before (these photos do not do justice to the dinginess/spottiness of our cream colored carpet which, thanks to lots of kid snacks and cat puke, was way past its prime):
The carpet was ripped up, along with the dingy old oak flooring that covered the entry way. The installation was a two-day process (two LONG, NOISY days. REALLY NOISY). Here are some photos M. snapped after Day 1, when I was happily sleeping in a hotel room, far from the dust and noise. As you can see, due to various "problems," the workers hadn't made it very far in the installation process (they told us afterward that they had estimated this to be a one day job, as they were cleaning up and leaving at 7 pm of the second day):
Once we had cleared up all the residual saw dust, random smudges of wood putty, and layers of rug dirt that covered everything in sight, though, the expense, hassle, and noise proved to be worth it:
The kids were so excited that they were easily conned into manual labor:
And prior to buying a new area rug to define the "living room" part of the space, we all enjoyed a few rousing rounds of bowling:
Our new area rug arrived today, so now I can show you the official "After" photos (with the caveat that we'd still love to get new curtains, a new dining room table, new kid chairs, and a new coffee table SOME DAY):
 |
| Notice that my cat is the queen of photo bombing |
Part 2: The Tile
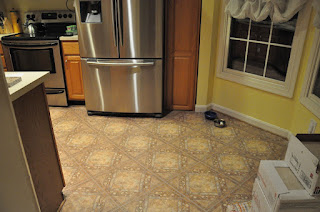
We contemplated extending the hardwood floors into the kitchen, which was blessed with this wonderful linoleum tile:
However, there was some concern that if we put hardwood in the kitchen, it would raise the floor up enough that we wouldn't be able to pull out the dishwasher if we ever needed to. Also, aesthetically, we were a little worried about having so much wood (next to the oaky, grainy cabinets) in such a small space. So instead we had a porcelain tile installed. The hardwood work finished up on a Tuesday, and we readied for the tile install two days later. As with the hardwood install, there were some unexpected surprises (a cabinet that wasn't mounted properly and had to be moved out of the way, uneven floors, etc), so what was supposed to be a two-day job turned into a three day job. BUT, the first two days were a Thursday and a Friday, and the last day was a Tuesday. So we had several days without a proper kitchen, and yet another round of construction dust to clear away when it was all over. We are VERY happy with the results, though - it came out great, and I think we made a good choice with the tile:
Next up (some day) will be a new countertop. I WILL remove all traces of linoleum and formica from this house, this I vow.
So there you have it - a bloody gazillion photos of floors. Come visit us and see them in person!!


Looks great! Have you thought about painting your cabinets and putting on new hardware? Pretty easy fix to update the kitchen. You are motivating me to do some home renovations myself, if my wallet can stand it :-)
ReplyDeleteWe actually put new hardware on the cabinets when we moved in (they didn't have any before). But we talk about painting/staining the cabinets all the time - I'm just leary of the amount of work it would mean! We're thinking of trying it out on one or more of the bathroom vanities first, and if it works out well, the kitchen is a possibility...
ReplyDeleteLooks fantastic!
ReplyDeleteIt looks AMAZING!!!
ReplyDeleteThe wood and tile both look awesome! Look for granite/other surfaces sales at Home Depot (they usually run a different one each month). You'd be surprised how reasonable it can be...and they do a great job!
ReplyDelete