Showing posts with label recipe. Show all posts

Sunday, July 21, 2013

DIY Window Blinds and Weekending

I'm exhausted from my three-day weekend - it appears that "relaxation" is not something I've included on my long "Furlough Friday" to-do list. M. and I scurried around and knocked out some tasks around the house like a boss (or, I suppose, bosses). On Friday, I jogged (sort of - the insane heat forced me to walk now and then), and spent a good three hours refreshing the trim paint in our kitchen. Then Saturday, I set to work creating some new blinds for our kitchen windows, to complement the new backsplash/paint/countertops we have going on (full reveal post to come soon, I promise!). This was an idea I got from a Young House Love blog post. They called it a "15 minute window shade" project, but it took me over 3 hours and required some assistance from M. Then again, I don't DIY for a living the way they do. And either way, I am so, so thrilled with how it all turned out:

Here is an old "before" photo, where you can kind of see the curtains we used to have - cheap, shabby chic-ish curtains from Target that were now more grey than white.
 
Here is where we were starting yesterday - the old curtains had been thrown away, the curtain rods removed/holes patched, and the walls painted with Benjamin Moore's Nimbus Grey. Oh, and also lovely fresh trim in Behr's Creamy White.

M. was working on his own project while I got going with the shades, but more on that another day - it's not quite done yet.

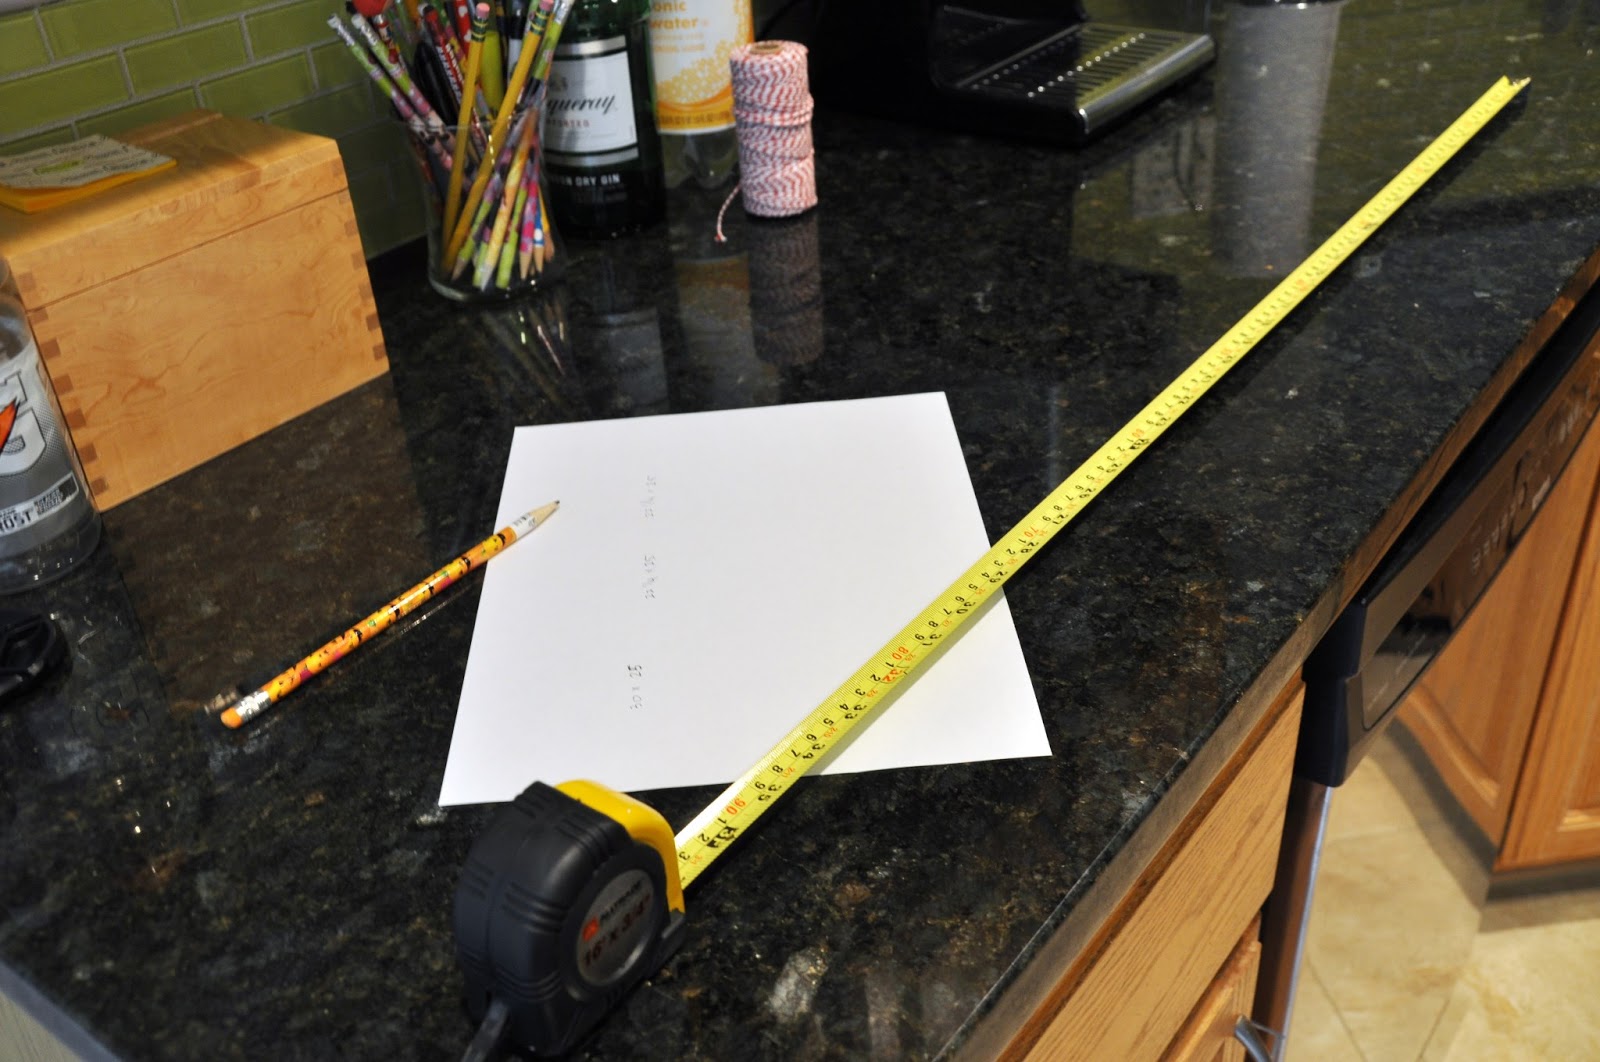
I measured my windows carefully, then added 2 inches to the width and 4 inches to the length to account for hemming my fabric and mounting the shade at the top to a piece of 1 X 2. So, for example, I wanted my shade to cover an area of 30 inches wide (from inside frame to inside frame) and 25 inches long for the larger window on the left. So I cut my fabric to 32 inches by 29 inches. The other two were the same length, but only 22.25 inches wide, so I cut that fabric to width of 24.25 inches.

Here is one piece of fabric, ready to go. Note the iron at the ready? That's because no sewing needles were harmed in the making of these shades. Instead, I used Heat and Bond for iron-on hems:


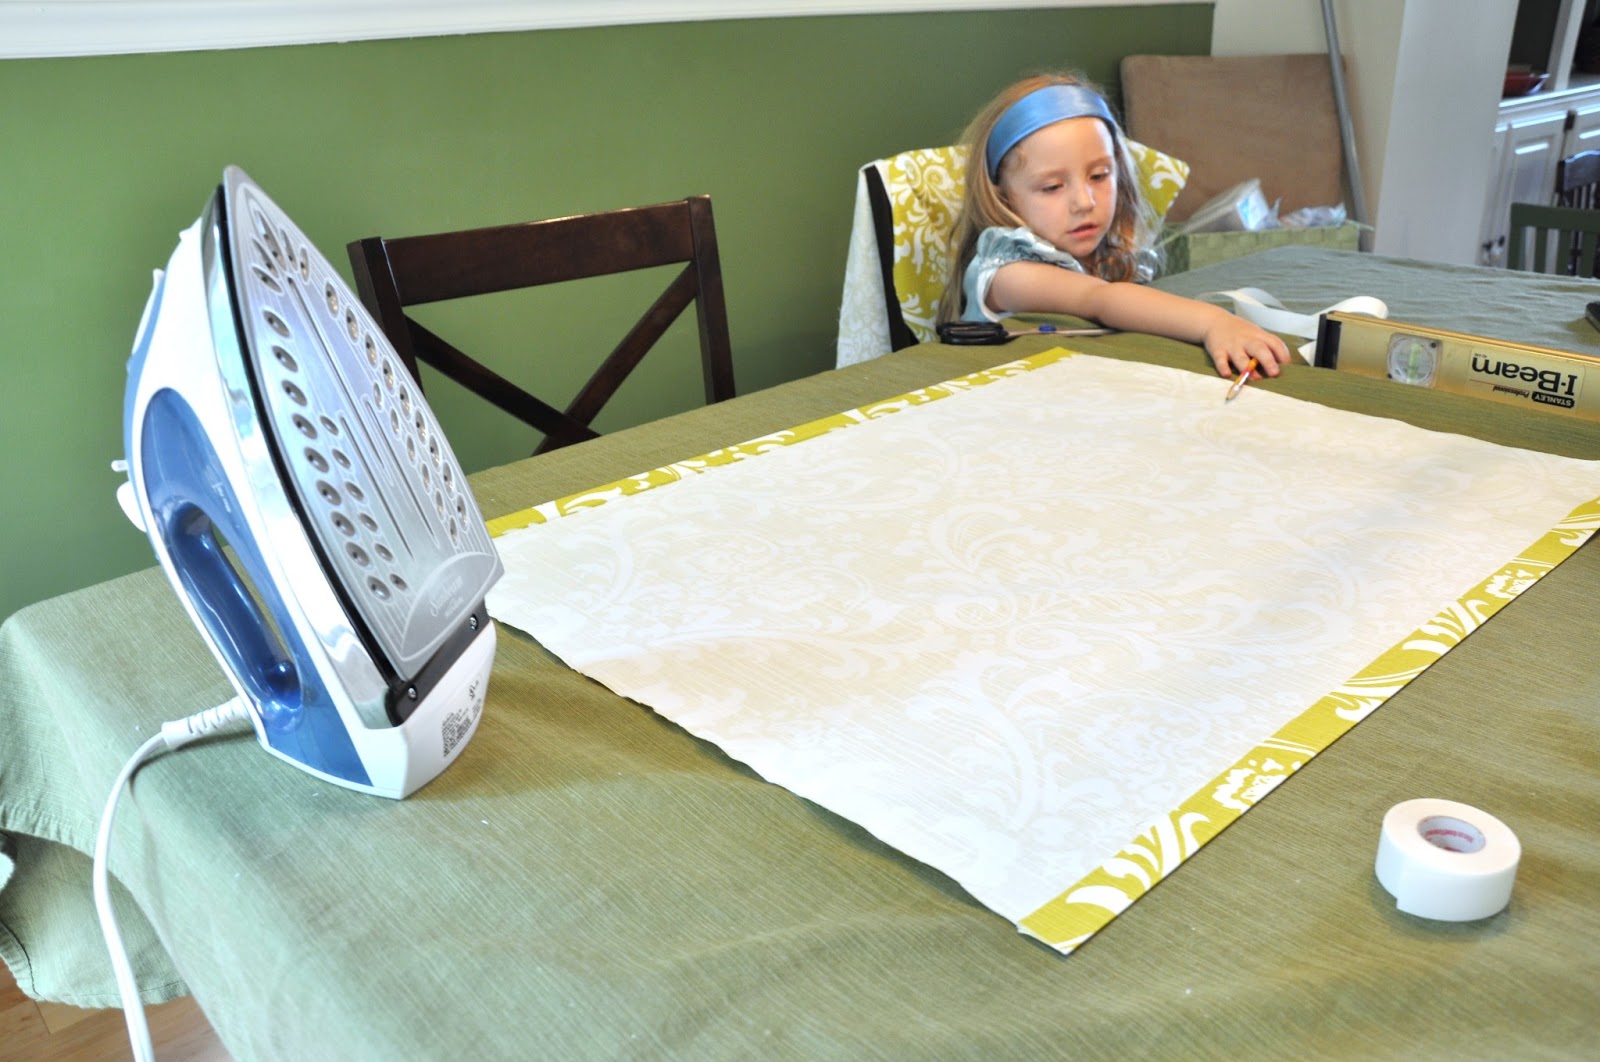
I applied the tape along each side of the fabric (paper side up), ran the iron over it fairly quickly (directions say 2 seconds), and allowed it to cool a little. Then I peeled the paper off the adhesive, folded the fabric over, and applied the iron again, for longer this time (8 seconds). As you can see, Cinderella was helping me.
 

Then I repeated the process on the ends of the fabric.

And voila! A nice, neat panel of fabric, ready for hanging (that's a Finn hiding under there).

Once all three panels of fabric were hemmed, I cut a 1 X 2 down into three pieces the same width as the panels, and mounted the fabric over it using a staple gun.

 
Then it was time to hang the panels, but I immediately ran into a problem. In holding up the shades, I realized they wouldn't fit - there were small tabs sticking out of the window frame up at the top that I hadn't accounted for when I was measuring:

 
Just as M. was gathering up his jig saw to try to come to the rescue, I realized that I could just pop the plastic tabs out:

Ah, much better. Not sure what those tabs are actually for, but I hope they aren't important!
 
To mount the shades, we pre-drilled holes into the 1 X 2, and in the process, realized that we needed to do something about the fabric. Because of the way the shade is mounted, the fabric runs between the 1 X 2 and the window frame, and we were worried that it would rip or bunch up when we screwed the wood in (this happened a little with the first hole that we pre-drilled). So once our holes were pre-drilled (making sure the fabric was out of the way), we made small holes in the fabric over the screw holes. Then I dabbed a little clear nail polish around the holes to make sure the fabric wouldn't fray or run down the line:

Trust me, there's a hole there.

Then the entire thing was screwed into the top of the window frame - two screws for the smaller windows, and three for the larger one. Beware - because the screws need to go through the thick part of the 1 X 2 (so, 2 inches) and into the window frame, long screws are needed for this. This was something I hadn't prepared for, but luckily we had enough spare screws of the right size on hand.
 
And this is what we ended up with:

I'm still in shock that somehow, all three shades are the same length. I was SURE that somehow things would get uneven during the whole process, even though I spent about an hour of my three + hour project carefully measuring.


I love how they turned out - I think they add a great little flash of color when you look from the living room into the kitchen, and they coordinate nicely with our new backsplash (which, I swear, I will show you one day!). And the cost couldn't be beat:

Fabric (2 yards, on sale for 50% off): $23.50
1 X 2: $1.15
Heat and Bond: $4

Three shades for under $30!!

A few other things I can't resist sharing from the weekend:

Finn went to see Turbo in 3-D with a friend on Friday - I can't even begin to tell you how excited he was about this! I picked him up from camp before 1 p.m. - oh, the thrill of leaving early! And for a play date with his best friend?! He was bouncing off the walls. Anyway, the movie was a hit, as was the play date, and Finn has spent most of the last 48 hours wearing his 3-D glasses.

I made these blueberry muffins. If they taste half as good as they look, I will be in heaven. I had to fight M. and Lucy off with a stick, so determined were they in sneaking one before dinner (and yes, that is a peek at the new backsplash!).

I took all this (crazy) squash...

chopped it up...

and turned it into this Zucchini Gratin from Our Best Bites.

It was fabulous - M. and I scarfed it up. I made the kids each try a bite. Finn gagged. Lucy actually threw up. So... mixed results. But a win for the grown-up crowd, and I highly recommend it.

While I cooked, the kids tore apart the house and piled many toys, blankets, and themselves in the middle of the living room:


Whew, I'm exhausted just typing this! And I didn't even mention the kitchen shelves M. is refinishing, or the loads of trim we painted (once you start, it's so hard to stop!), the pool time, the grocery shopping, the laundry...

Thank god it's almost Monday?

Sunday, February 3, 2013

An Early Spring, Badger Brew, and Buffalo Cauliflower

Now that I've paused from stuffing my face with fun Super Bowl food (Go Ravens. Except Ray Lewis, who can suck it), I will recap our weekend festivities.

First, we took time out from our weekly Saturday morning scramble to check in with the Groundhog. Did you know there are TWO official groundhogs? I did not, until yesterday. But there are, apparently, and both Punxsutawny Phil and Staten Island Chuck seem to agree that there will NOT be 6 more weeks of winter. Do we attribute that to lack of a shadow, or global warming? Don't know, don't care - it's been cold enough around here that I'm happy either way! Though I must say that I'm probably not the only one who would welcome an early spring - my poor daffodils have been quite confused by the whole oscillation between ridiculously warm and ridiculously cold, and I think I can see the new green shoots they recently put up actually shivering. It's sad.

Saturday we readied ourselves for a party in honor of the Grand Opening of the Badger Brewery, aka the inaguaral showing off of M.'s home brew skills, aka an excuse to have friends over and drink beer. I made lots of food, we tidied up the house, and Lucy put on a party dress. I went a wee bit overboard with some of the smaller details - sort of ran with a whole "theme," as you'll see in a moment. I got sucked into the Pinterest-inspired madness of Baker's Twine (it's just so damn cute), and tried my hand at DIY cake stands with near disastrous results. Let's just say that I very nearly spray painted a significant portion of our dining room and outside deck with red spray paint. I ended up with two functional, cheap, and cute (if you don't look to closely) cake stands, but I'm not sure the trade-offs were worth it. DIY projects are much easier when it's not 16 degrees and dark outside... Anyway, on to the photos:

The moniker "Badger Brewery" is inspired by M.'s alma mater, the University of Wisconsin, and the school colors are red and white. Home brewed beer is bottled into plain brown bottles, so to dress them up a little and give us the option of keeping track of the type of beer in a given bottle once we have more than one made, I ordered some custom hang tags from My Own Labels:


The tags (tied on with red and white baker's twine) say "EST. 2013" on the first line and "BADGER" below. Kind of cute, right? Plus, they are reusable, so I think of this as more of an investment than a frivolous party detail ;-) (I don't, really).

Then I got even more rididulous, and ordered matching napkins and coasters from For Your Party:


I covered the tables with brown Kraft paper and decorated with red, white, and yellow flowers in mason jars and beer bottles:


Again with the baker's twine. I'm hooked.

For drinks, we had M.'s beer (of course), some wine that went pretty much untouched, sparkling water, and juice boxes for the kids. The party began at around 5, so we had a pretty hearty spread - Crockpot BBQ chicken with rolls and coleslaw, mini hot dogs in mini buns for the kids, spinach balls (Nat! I used your recipe!), little spinach and artichoke tortilla crisp appetizers from Wegmans, cream cheese and hot pepper jelly (Stonewall Kitchens) with crackers, homemade soft pretzels, and fruit.


And finally, hiding in the back there on the fateful cake stands, were two types of cupcakes: Chocolate Guinness cupcakes with cream cheese frosting, and Blue Moon cupcakes. Yes - beer flavored cupcakes. I changed the recipes a little bit by leaving out the beer that was called for in the frosting - even though it was only a small amount, it seemed unwise to feed that to kids :-). I didn't worry about the beer in the cake mix, since the alcohol gets cooked out. They were awesome. I've eaten too many:


The party was lots of fun, and I got a chance to catch up with some friends I hadn't seen in a while. The kids (there were 10 including ours) all got along pretty well, and happily made a mess of our basement level. Which was MORE than fine with me, as it meant they were relatively occupied. M. and I crashed soon after the last guests left, as Lucy had deemed it necessary to wake us up about 6 times the night before.  She then repeated the feat on Saturday night, too, so M. and I spent a lot of today absolutely exhausted. Turns out she has a cold, and as of tonight, possibly an ear infection, too. We may be making a trip to the doctor's office tomorrow...

Exhaustion aside, we rallied enough to follow the American tradition of eating food and watching the Super Bowl tonight. I fed the kids leftovers from last night's party, and M. and I scarfed an entire plate of something I've been wanting to try - Spicy Buffalo Cauliflower Bites. I'm a fan of the buffalo flavor, something I discovered long after I stopped eating meat when I happened to try the delight that is Buffalo Shrimp on a vacation in Florida. M. is a wing fan, but rarely orders any since he's always the only one that eats them. I've been seeing various recipes for Buffalo Cauliflower on the web, and finally got around to trying one. I used the one from Skinnytaste, and it was fan-freaking-tastic. I ate so much of it that I'm going to poop fire tomorrow. You've been warned.


M. already has a second beer fermenting as we speak - I'll need to think of some way to top myself when we crack in to that one. Whatever I do, I'm sure there will be baker's twine involved.

Thursday, March 15, 2012

Arguably Better Than a Pot of Gold

Pinterest has me salivating over hundreds and hundreds of recipes that look SO. GOOD. And also so, so bad for you. I try not to pin the worst offenders (waffle cakes! cinnamon roll pancakes! anything and everything red velvet! more macaroni and cheese recipes than you can shake a stick at!), but sometimes I'm weak. Such was the case with a brownie recipe that caught my eye about a week and a half ago - the "Triple Layer Fudgy Mint Oreo Brownies" from Averie Cooks.

Now, if there are more mac and cheese recipes than you can shake a stick at on Pinterest, there are more brownie recipes than you can shake a whole forest at. Or whatever. The point is, there are a lot. And they all look ricidulously delicious. But this particular brownie recipe had a few things going for it that put it in the "perfect storm of sinfulness" category. First, it involves Oreos. Lots of Oreos.

(There are Oreos on top. And there are Oreos inside.)

I love Oreos. Their trans-fatty goodness has been a favorite of mine since childhood (actually, I preferred the Hydrox over the Oreo, but since the Hydrox cookies are no longer available, I make do. Also, Wikipedia tells me that Oreos no longer contain any trans fat, so there's that, too), and as a child, my favorite ice cream flavor was always Cookies 'n Cream/Oreo, depending on what each ice cream venued chose to name it. With chocolate jimmies (NOT "sprinkles"), of course.

 I also love holiday-themed goodies, and these brownies involve lots of green and mint, perfect for the imminent St. Patrick's Day holiday. They are layered and gooey-looking and very, incredibly, not Weight Watchers-friendly. Or so I assume - I'm not crazy enough to attempt that math.

But I made them anyway, with the goal of providing a holiday-ish snack to share with my work colleagues (and M.'s). It's an excuse to make something I very much want to eat, but of which I very much don't want to have a whole pan sitting in my kitchen, tempting me.

I won't recreate the recipe instructions here - the original blog post does them far better justice than I could. But I will say that these were really easy to make. The only "shortcut" step I took was to use storebought vanilla frosting instead of homemade buttercream, but the brownies themselves I made from scratch, according to the recipe. It was easy, and I didn't have to dirty any kitchen appliances in the process (I mixed everything by hand).

I will also share some pictures, so YOU can salivate over these, too, just like I have been. See, don't these look festive and delish?


In other news, M. has decided that he is no longer "against" Pinterest. Hurrah!

And Slainte! Happy St. Patty's Day to all!

Sunday, February 12, 2012

Two More Recipes My Kids Won't Eat, But YOU Might Like

I've been putting my food blog-reading and Pinning to good use lately, trying out several new recipes, with varying degrees of success. Here are two that fall in the "success" category - definitely good enough to make again!

First up is Spicy Sriracha Grilled Tofu, from Bon Appetit via The Bitten Word (love the title of that blog, BTW). M. and I are relatively new to the Sriracha team - we discovered it's deliciousness a few years ago at a local Noodles and Company, where the tables are graced with their own bottles of the stuff, and we learned to use it to garnish all sorts of asian and cream-based pasta dishes (with a firm, but not-too-heavy, hand!). We are converts, and have a bottle of our very own living in the fridge now. Mac 'n Cheese just isnt' the same without it now!


Spicy Sriracha Grilled Tofu

Serves 4

INGREDIENTS

1 14-16 ounce container extra-firm tofu
3/4 cup Sriracha
1 tablespoon roasted sesame seeds plus more
1 tablespoon soy sauce
1 tablespoon white miso paste
3 chopped scallions plus more
2 garlic cloves

DIRECTIONS

Cut tofu into 1" blocks. Drain well on paper towels.
- My variation on this is to place the block of tofu between several layers of paper towels, and top with something heavy to press the water out. Change towels once. When you think you've gotten all the water out, or you're just tired of waiting, then cut the tofu into 1" blocks. Make sure to cut the blocks big enough that they won't fall through your grill grate.

Put Sriracha, 1 tablespoon sesame seeds, soy sauce, and white miso paste in a blender with 3 chopped scallions and garlic cloves. Blend with water until smooth. Reserve a cupful for dipping; marinate the tofu in the rest overnight.
- I didn't have any sesame seeds on hand when I prepped the marinade, so I added a dash of sesame oil instead. I think it worked very nicely - there was a yummy hint of sesame, but not overwhelming. Also, I found that the amounts made for A LOT of marinade - you could probably reduce the ingredients by 1/3 and still have plenty for the recipe. Looking at the pictures on The Bitten Word, though, I probably added more water during blending than the authors did. I don't really know how much water I added - maybe a cup? Possibly less? Whatever the amount, it worked well - the marinade was thin enough to coat the tofu nicely and to use for drizzling at the end, but not watery.

Shake off excess sauce and grill tofu, brushing with sauce. Sprinkle with roasted sesame seeds and scallions.
- As noted in the original blog post, make sure you oil your grill well before starting. I used a heavy dose of cooking spray. M. (who did the actual grilling) reported that he still had some trouble with sticking, but no tofu chunks were sacrificed to the grill flames. We did not brush on more marinade during the grilling process, but I drizzled a little on after the cooking was done. Also, by this time I had successfully purchased sesame seeds (already toasted, FTW!), so I sprinkled them on (and the scallions) per the instructions. I heart sesame seeds.

The result was a) pretty; b) flavorful; c) SPICY!


We ate the dish with a glass of milk. M., who is not a tofu lover, ate all of his portion. There were no leftovers, and I've since made the dish again (with the leftover marinade from the first time), testaments to the success of the recipe. If you like spice, make this! You won't regret it. Unless your children are freakish, they won't eat it, of course - plan something simple and easy to serve them instead (PB&J, anyone?).

Next up is Skillet Gnocchi with Chard and White Beans, from Eating Well. I like this recipe because it is quick and simple to prepare (and also it tastes good, natch). You could fancy it up (and add a bunch of time to the prep process) by making your own gnocchi, of course, but I was more than happy to follow the recommendation to use shelf-stable gnocchi from the grocery store. I struck out at my usual grocery store, though, and had to go to another one to find them. But find them, I did!

Skillet Gnocchi with Chard & White Beans
From EatingWell: January/February 2009
6 servings

Ingredients
1 tablespoon plus 1 teaspoon extra-virgin olive oil, divided
1 16-ounce package shelf-stable gnocchi, (see Tip)
1 medium yellow onion, thinly sliced
4 cloves garlic, minced
1/2 cup water
6 cups chopped chard leaves, (about 1 small bunch) or spinach
1 15-ounce can diced tomatoes with Italian seasonings
1 15-ounce can white beans, rinsed
1/4 teaspoon freshly ground pepper
1/2 cup shredded part-skim mozzarella cheese
1/4 cup finely shredded Parmesan cheese

Preparation
1. Heat 1 tablespoon oil in a large nonstick skillet over medium heat. Add gnocchi and cook, stirring often, until plumped and starting to brown, 5 to 7 minutes. Transfer to a bowl.

2. Add the remaining 1 teaspoon oil and onion to the pan and cook, stirring, over medium heat, for 2 minutes. Stir in garlic and water. Cover and cook until the onion is soft, 4 to 6 minutes. Add chard (or spinach) and cook, stirring, until starting to wilt, 1 to 2 minutes. Stir in tomatoes, beans and pepper and bring to a simmer. Stir in the gnocchi and sprinkle with mozzarella and Parmesan. Cover and cook until the cheese is melted and the sauce is bubbling, about 3 minutes.

I followed the recipe exactly (with one exception), so I have no real tips to pass on. I've made the dish twice - the first time I used baby spinach because I couldn't find any chard (neither of the two grocery stores I went to had it! Chard Shortage! The panic!), and I added in some greek olives (the one change I made). The olives were nice, but not necessary, and I didn't add them the second time. The second time I managed to score myself some chard. I think I preferred the chard a little over the spinach, because it stays a little firmer on cooking, and doesn't clump together as much. Both versions were great, and M. has insisted this become a go-to meal. The kids wouldn't touch it - the first time I served it, Lucy and I had a stand-off over the tiniest, most miniscule piece of gnocchi, which she ABSOLUTELY refused to try. Even with the promise of dessert (cake!) if she just put the frackin' thing in her mouth. No deal. Finn ate a tiny nibble at my insistence (and to score dessert), but wouldn't touch more. The second time around I didn't even bother, I gave them leftovers. But unlike the tofu dish, this one might have a shot with other, slightly more adventurous kids - maybe even YOUR kids. After all, what's not to love about gnocchi? Potatoes and pasta, for the love of God! Winning combination.

Picture time. First up is the spinach version:


And here is the chard version:


They look remarkably similar, I realize. And perhaps not the prettiest dish, but tasty? Yes!

And since I'm on a roll with the food photos, you can see the labor of love (literally) I slaved over yesterday, in preparation for the kids' Valentine's Day parties on Tuesday:


This is one recipe I'm SURE the kids will eat!